

Kubernetes Cluster Load Testing using kube-burner
Analyze performance and reliability of clusters under pressure with kube-burner

As a seasoned system administrator with a passion for technology and problem-solving, I bring 6 Years of hands-on experience in managing and maintaining IT infrastructure. My journey in the field began with a deep curiosity for computers and systems, which has evolved into a fulfilling career dedicated to ensuring the smooth operation of critical business systems.
In this guide, we’ll walk through how to perform load testing on a Kubernetes cluster using kube-burner.
The goal is to evaluate:
Cluster stability
Resource utilization under heavy workloads
Scheduler performance when the cluster is stressed
Overview
kube-burner is a performance and scalability testing tool designed to stress test Kubernetes clusters by deploying configurable workloads at scale.
It’s a great way to validate how your cluster behaves under real-world load conditions.
Cluster Setup
Below are the cluster specifications used in this test:
| Role | vCPU | RAM | Storage |
| Master Node | 2 | 8 GB | 70 GB |
| Worker Node | 4 | 16 GB | 70 GB |
Installing kube-burner
Run the following commands on your master node to install kube-burner:
curl -Ls https://raw.githubusercontent.com/kube-burner/kube-burner/refs/heads/main/hack/install.sh | sh
This downloads, installs, and verifies kube-burner.
Create a Namespace for Testing
Before starting the test, create a dedicated namespace:
kubectl create ns stress-test
Deployment Template
Create a deployment template file namedtemplates/nginx-deploy.yaml with the following content:
apiVersion: apps/v1
kind: Deployment
metadata:
  name: nginx-small
spec:
  replicas: 1
  selector:
    matchLabels:
      app: nginx-small
  template:
    metadata:
      labels:
        app: nginx-small
    spec:
      containers:
        - name: nginx
          image: nginx:latest
          resources:
            requests:
              cpu: "100m"
              memory: "128Mi"
            limits:
              cpu: "250m"
              memory: "256Mi"
          ports:
            - containerPort: 80
This defines a lightweight NGINX deployment for load testing.
kube-burner Configuration File
Create a configuration file named kube-burner-config.yaml:
global:
  namespace: stress-test

jobs:
  - name: small-deployments
    jobType: create
    jobIterations: 50
    qps: 20
    burst: 40
    waitWhenFinished: true
    cleanup: false
    objects:
      - objectTemplate: templates/nginx-deploy.yaml
        replicas: 1
You can modify:
jobIterations→ number of workloads createdqpsandburst→ how fast workloads are createdcleanup→ whether resources are deleted after the test
Running the Test
Run the load test using:
kube-burner init -c kube-burner-config.yaml --uuid $(uuidgen)
This command creates the defined workloads and simulates real-world stress conditions in your Kubernetes cluster.


Monitoring the Cluster
Monitor your cluster performance during the test using these commands:
kubectl get pods -n stress-test
kubectl top nodes
kubectl top pods -n stress-test
kubectl get events -A | tail -n 20
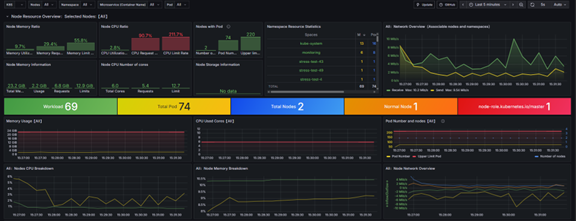
You can also use Grafana dashboards (connected to Prometheus) to visualize:
Node and pod CPU usage
Memory utilization
Scheduler latency
API server throughput
Cleanup
After testing, clean up all resources using:
kubectl delete ns stress-test
If the above command doesn’t work, try this alternative:
kubectl delete ns $(kubectl get ns --no-headers -o custom-columns=":metadata.name" | grep stress-test)
This ensures all test-related resources are removed from your cluster.
Conclusion
Load testing your Kubernetes cluster with kube-burner helps you:
Validate cluster stability
Identify resource bottlenecks
Fine-tune scheduler performance
You can tweak configuration parameters like jobIterations, replicas, and resource requests to simulate different load profiles.
References
“Updated on November 2025”


